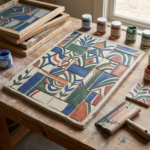
Nerikomi is a Japanese ceramics technique that creates intricate, geometric patterns running through the clay itself — not on the surface. Slice through a nerikomi piece anywhere and the pattern is revealed in cross-section, like a stick of rock candy. The results can be breathtaking, but the technique requires patience and planning. Here is an introduction to what nerikomi is, where it comes from, and how to get started.
What is Nerikomi?
Nerikomi (練り込み) is a Japanese term meaning “kneaded-in” or “blended clay.” It refers to the technique of combining multiple colored clay bodies to create patterns that run through the entire thickness of the clay. When the piece is fired, the colors are permanent — they are in the clay body itself, not applied to the surface.
It is related to, but distinct from, marbling — where clays are loosely blended to create organic, swirling patterns. Nerikomi typically involves more precise, geometric construction — building up blocks and layers of colored clay to create repeating patterns.
History and Origins
The technique has roots in ancient China (where it is called “cai ta” or “sancai”) and was refined in Japan during the Edo period. Japanese nerikomi is known for its precision and complexity — patterns of flowers, geometric grids, and abstract designs that appear throughout the clay body. Contemporary ceramic artists including Katsumoto Sakata and Yasuhisa Kohyama have pushed the technique into sculptural territory.
Materials You Need
- A white or light-colored base clay — porcelain works best for nerikomi because its white body shows colors cleanly. Stoneware can work but colors are more muted.
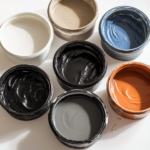
- Mason stains or ceramic oxides — for coloring the clay. Mason stains give the most consistent, predictable colors. Mix stains into the clay body at 5–15% by weight depending on the desired color intensity.
- A rolling pin and guides — for making consistent slabs of each colored clay
- A sharp knife or razor blade — for cutting precise shapes from the colored slabs
The Basic Process
- Make your colored clays — wedge mason stains or oxides into separate portions of your base clay. Each color should be thoroughly and evenly incorporated with no streaks.
- Roll slabs of each color to a consistent thickness using guides.
- Stack, cut, and assemble the colored slabs into a block — the arrangement of colors in the block determines the pattern that will appear when sliced.
- Compress and roll the assembled block to bond the layers together.
- Slice the block to reveal the pattern — these slices become your working slabs.
- Build with the slices — drape over molds, press into forms, or use as decorative inserts.
Key Challenges in Nerikomi
- Matching shrinkage rates — all colored clay portions must use the same base clay body so they shrink at the same rate. If they shrink differently, the piece will crack during drying and firing.
- Color bleeding — soft, freshly made colored clay bleeds easily when pressed together. Work with clay at a slightly firmer consistency to keep colors crisp.
- Pattern planning — the assembled block looks very different from what the sliced pattern will reveal. Planning on paper before you start saves a lot of wasted clay.
For more on making colored clay, see our guide on Making Colored Clay. For the marbled clay variation, see Marbled Clay Techniques for Pottery.