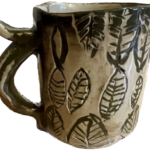
Stamping and texture tools let you impress patterns directly into clay at the greenware stage — before bisque, when the clay is still soft enough to take an impression. The marks fire permanently and can be left unglazed to show the clay body, highlighted with a wash, or filled with underglaze for contrast. It’s one of the fastest ways to add consistent surface decoration across a production run.
When to Stamp
Stamp on soft to medium leather-hard clay. The clay should be firm enough to hold the impression without the walls collapsing, but soft enough that the stamp presses in cleanly without cracking the surface. Too soft and the clay sticks to the stamp; too firm and the impression is shallow and the edges crack.
Types of Stamps
Bisque-Fired Clay Stamps
Made by carving a design into soft clay, then bisque firing. The fired clay is hard and durable, won’t stick to greenware, and can be reused indefinitely. The most common studio-made stamp. Carve in reverse — any text or asymmetric design needs to be mirror-flipped before carving.
Metal Stamps
Laser-cut or machined metal stamps — typically brass or stainless steel — give sharp, precise impressions with clean edges. Durable and consistent across large production runs. Good for logos, signatures, and fine detail. B2W uses metal greenware stamps for the studio mark. Available from Etsy vendors like SozDat.
Rubber Stamps
Soft rubber stamps press into clay cleanly and release easily without sticking. The flexibility of rubber means they conform slightly to curved surfaces better than rigid stamps. Good for larger designs and decorative patterns. Available custom from vendors like TailorMadeStamps on Etsy. Note: rubber stamps work better on flatter surfaces — significant curvature limits even contact.
Found Object Stamps
Bolts, coins, bottle caps, shells, woven fabric, lace, corrugated cardboard, buttons — anything with a texture can be pressed into clay. Found objects are the quickest way to test a texture idea before committing to a dedicated stamp. Results are often more interesting than planned patterns.
Texture Rollers and Discs
Rollers pressed across a slab or the surface of a vessel create continuous repeating patterns. See the full guide: Creating a Clay Disc Roller.
Stamping Technique
On Flat Surfaces (Slabs)
Press the stamp firmly and evenly into the slab using both hands. Apply pressure from the center outward to avoid rocking, which blurs the edges. Lift straight up — don’t drag. For large stamps, use a rolling pin over the back of the stamp to apply even pressure across the whole surface.
On Curved Surfaces (Thrown Pieces)
Support the inside of the wall with your other hand as you stamp — the clay needs backing pressure or the wall will flex and the impression won’t be crisp. Press firmly but briefly. For the base of a mug or bowl, keep the stamp small enough to accommodate the curvature — a stamp larger than about 20–25mm will have uneven contact on a curved surface.
- Tip: If the stamp sticks to the clay, the clay is too soft. Let it firm up another 15–20 minutes. If the edges crack, the clay is too firm.
Highlighting Stamped Texture
Oxide or Underglaze Wash
After bisque, brush an oxide wash or thin underglaze into the stamped impressions, then wipe the surface clean with a damp sponge. The color settles in the recesses and highlights the pattern. See: How to Make Ceramic Washes.
Contrasting Glaze
Apply a base glaze, then wipe or sponge a second contrasting glaze over the stamped area. The thicker glaze collects in the recesses; the raised texture shows through the thinner coverage on the high points.
Unglazed Texture
Leave stamped areas unglazed using wax resist before glazing. The bare clay texture contrasts with the glazed surface. Works especially well on matte and satin glazes where the transition between glazed and unglazed is more subtle.